Bob – Hip or Mumsy?

What makes a Bob look hip and cool and what makes it look mumsy?

This one has always been a tough one for me, the number of times a client comes in asking for a Katie Holmes or a Nicole Ritchie and expect to look like them is beyond me. Women want bobs but most don’t want to look mumsy,(or like a soccer mum) so what can be done about it?

After alot of thought, I have come to the conclusion that if the client really wants to try it anyway, it really depends on a couple of factors and afew are dependant on whether the clients understands she needs to make some effort:

1. Whether the haircut has been done in a flattering but funky way,i.e., to suit the face shape with good angles, and whether its been cut to give movement throughout the ends.This does not necessarily mean lots of choppy layers either. Helps big time if your hairstylist understands the difference too.

2. Whether the clients facial features can carry it off without making them too old and stuffy, which bobs can tend to do. This is a tricky area but if a client tends to look abit older then the bob WILL look a little mumsier. Make up will help… as seen on Katie Holmes when she debuted her bob with the dark smokey eyes.

3. How the client dresses can affect the way the bob is perceived. If they are running going around in sweats all the time, then yes, the bobs going to look mumsier.

4. And lastly, how it is dried and worn, If the bob is stiff with no movement then that’s how it will come across,whereas funkier layers and movement can be accentuated with products or a flat iron.

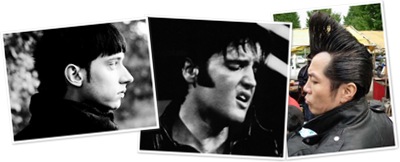
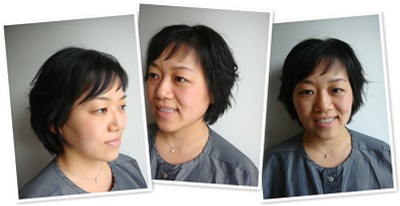
We’ve all seen bobs we’ve liked and ones we don’t like ,so I pulled afew examples of ones that I feel would show the differences in what I am trying to say, hopefully this will give you all an idea to see for yourselves.

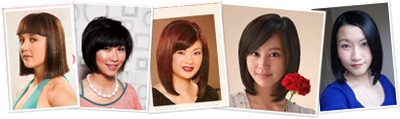
From the above pictures you can see even without me pointing out, that one of the things missing in the 2nd row is movement, all the hair is stiff (with or without layers), whereas the top row has movement, fun and even with a one length bob, it can look hipper!

Hey but with all that said, its only hair and it grows back if you don’t like it, so if you haven’t had short hair and want to try it, go ahead.. Eva Longoria did!

Evas bob

You tell me what row you would put her in?

Men’s sideburns…..

Sideburns are a very important part of a haircut. Some guys may not put enough thought into this, but the length, thickness, and shape all help develop an image that defines an individual. We all know that unfortunately with Asian hair, most guys sideburns don’t really grow through much, but for those lucky ones who’s burns do grow then alot of fun and expression can be had.I would like to go through afew basic choices in shapes and give you my thoughts and opinions on them.

Lets start with NO sideburns: This image (below) is usually sported by the military. Hair is shaven so close that there is no stop or start to the hairline. On the right person, this look can be converted from stiff and formal to a trendy hip look, i.e. Beckham

Beckham

But be warned, on the wrong person, this could happen:

Asian Shaven

Then there’s what I call the Forest Gump, where the hairline is taken high on the sides, usually the guideline to where a sideburn should start is by following the corner of the eye, it should not go higher unless you want the Gump look, not too hot I might add:

Forest Gump Nic Cage

Basic Men’s Length: This is what I call the business mans length, safe and normal with just the right thickness.

david Archuleta

From there we have the slightly longer lengths, which I think make a normal haircut look slightly trendier:

Asian with basic Basic Asian basic

Onto slightly different funkier sides, I chose to keep this quite basic as I could’ve very easily found some CRAZY looks but didn’t want to go there, so from ultra thin and long to ultra thick like Elvis’s (very renowned for his sideburns):

And finally, for those of you who’s sideburns may grow and grow, here’s some fancy dancy looks of Ludacris:

Ludicrus 1 Ludicrus 2

Definition….Davines

Davines – Defining Invisible Paste:

This product is one of my favorites right now and I constantly go back to it because of its reliability to give me a messier chunky texture in short to medium length hair. This is a soft creamy paste that is very easy to distribute throughout the hair, although I tend to put it more towards the ends of the hair and I leave out the roots (as it may make it look greasy) My method of application is to rub it into both hands and with the hair hanging forward or sideways away form the scalp, I grab a clump of hair and roll it into the ends.

Once the product is evenly distributed, I dry it with a dryer, either with or without a diffuser and slightly squeeze the hair to give the hair a messier look.

DSC05767

Pregnancy Hair….

Wanted to write a short article explaining what happens to hair during and after having a baby. (as witnessed by me over the years)

I would to make myself clear in saying that I am speaking ‘in general’ as these things do not happen to all women and sometimes nothing happens at all. You just cant explain what hormones will or will not do to a person ……

You’ve heard about how a woman ‘blossoms’ during her pregnancy, and this is partly due to her healthy hair and skin. Usually during pregnancy the hair becomes thick, fast growing and shiny.

After the baby is born, with some women this is when the hair starts to thin and hair loss happens around the front hairline… but most of the time this doesn’t happen until after breast feeding is finished, during this period the hair around the hairline can fall out causing a slightly thinner looking hairline,especially around the temples. And no your hairdresser did not cut it off!! (I’ve also heard this accusation too) It does eventually grow back, but not before you have that tough period of trying to hide or slick down those short stray hairs, In extreme cases the whole front hairline can end up falling out, I have seen such cases and it is always advisable after it has grown back out abit, to cut some kind of cute fringe in, so that it looks like it ‘meant to be’!

Here is Mina, who’s baby is now 18months old, she came to me with her hair all thin and wispy, the front area had started coming back but was still in its wispy stage.

We decided to cut her hair shorter so we could make it look thicker, and to bring the sides and front area much shorter to make it look more of a definite shape. We also brought out the waves more by drying it with a diffuser using a curl activating product.

Trimming Your Own Fringe

As demonstrated by Joni Shibata….

Now that nearly everyone and their mothers have some type of fringe (bangs here in America) the upkeep is more frequent and it is important to keep them just so… mainly so you can see. So if you cant get yourself to your hairdresser (who will usually be nice enough to offer a freebie fringe trim in between haircuts) then you should know how to trim your own. You should know that the more frequent you trim it the easier it is, becos if you leave it until the hair has already lost the shape it is very difficult to follow the original lines.

In the following demo video the fringe shown is more on the heavier blunt side, I will continue to show you other videos of different types of fringes. Know that in order to show you all the steps we have kept it as short and sweet as possible.

1. Section the longer hair away and tuck it behind the ears
2. Keep the triangle that the fringe is forming as clean as possible
3. Section the hair into 3 parts – middle and 2 sides
4. Start with the middle section and hold in between the fingers
(note) do not hold and pull the hair tight as it will bounce too much
also it is best to do it on dry well positioned hair as wet hair it dry up too much
5. Cut up into the hair, (not straight across) into little ‘V’ shapes
(note) the more you hold the hair out away from face, the softer the line
The ‘V’ shapes will allow for slight movement in the edges
6. After cutting middle section to the desired length, join both side sections in the same way
7. the outer 2 sections can be either cut straight cross or curved down slightly (your choice)
8. Once desired length is achieved throughout, comb down and clean up the edges.
(note) at point 58 secs in the video, it looks like Jonis poking at her eyes but this is not the case
9. Check outside line to make sure it is clean
10. Good Luck!!

Notes on Highlights and Slices

Because there are so many different kinds of looks with colors, if you have a particular look in mind, take some pictures into the salon with you, as long as you are being realistic and know that yours will never be exactly the same as the picture it will give the technician an idea of what you like or dislike. Tell the stylist what you have in mind and in return they should also tell you what is possible and what is not. Don’t go in with absolutely no idea and clues (especially if its your first time) the stylist will end up spending alot of time just trying to get to know your likes and dislikes rather than spending the time talking about the more important things like color choice and method also know that if your going for a natural look, choosing a natural hair color as well as choosing a natural hair technique could result in it being TOO natural for your liking, be very precise about your choice and needs.

Hair Question ~ Teasing Hair

Question by TwinkieChan:

jules!
i have a hair question. i have been in the habit of teasing my hair to get volume. i have defaulted to a comb that has little extra barbs or something in the teeth to catch hair (it also has long metal prongs on the bottom and i have no idea what those are for). then, at night , i use a regular comb (without the extra barbs) to comb out the hair spray and backcombing. i feel like the combing out is especially harsh, and could cause a lot of breakage. do you recommend other combs/brushes/tools, either for backcombing, or combing the hair out?

Answer:

Yes, all that combing and faffing is very harsh for the hair, even tho our hair can handle anything really but your much better off using a brush for the back combing. Bristle brushes are best for both backcombing and for brushing out afterwards as they will not tear the hair out. There is a brush you can buy which is specifically for backbrushing. I will post a pic of it and also others that I find works well too.


Here are 3 brushes that I recommend,
1. Spornette Littlewonder backbrush.

2. Y S Park small round brush, great for back brushing and
3. for longer hair.. the Y.S Park Paddle Brush.

Brazilian Straightener by Lucky from Dekko

You’ve all heard about this new fabby treatment that’s available right? The Brazilian Straightener. Because of the technicality of it all I asked Lucky (top technician) from Dekko Salon to do the write up so you get an idea of what it is precisely:

Jules has been kindly nudging me to write about the Keratin Treatment, aka the Brazilian Straightener. So here is my share on information I have gathered and personal experience.

What Is It? The KT/BS is a demi-permanent keratin based relaxer that originated in Brazil over 10 years ago. Hence, the name. Demi-permanent means it doesn’t permanently change the hairs structure resulting in permanently straightened hair like the Japanese or Sodium Hydroxide based relaxers do. Nor does it work like an anti-curl semi permanent, which washes out completely and reverts back to it’s natural state,

So How Does It Work? The KT/BS surrounds natural hair bonds with conditioning keratin, which is then sealed into the hair with heat. It remains in the hair for approximately 4 months depending on how often the hair is washed. The more often the treatment is done, the straighter the hair gets and the texture is improved.

Who Would Benefit? Anyone who doesn’t love their natural texture. The KT/BS diminishes frizz. It will also straighten or minimalize curl depending on the amount of natural curl. It works on all hair types. Including highlighted, tinted, previously relaxed and bleached. Yes, bleached! The treatment is done, and in 24 hours completed at home with the provided shampoo and conditioner.

Who Would Not Benefit? Clients who are frequent swimmers or ocean dwellers. The chlorine and salt in the water will shorten the life of the treatment.

Is It Safe? The question arises from the use of masks during the treatment. The masks are used to minimalize the effects from the steam emitted when heat is applied to the treatment. One of the active ingredients in the KT/BS I use, Lasio, contains 0.02% cosmetic grade formalin. It is necessary to give the product longevity. Formalin is found in many cosmetic and household products such as: nail hardeners, shampoo and conditioners, medicines, carpets, vinyl, permanent press fabrics and many more. I nor my clients have never experienced any adverse reaction while giving this treatment.

Will post some before and after pics later on!

Stylists Notes on Styling Curly Hair

There is a difference in drying curly hair with and without a diffuser.

If the hair is diffused, the air flow from the hairdryer (even tho less than a normal dryer flow) gets into the hair and roots more, therefore lifting the hair away while it is drying, thus leaving the hair airier and curlier. The steady air low does not disturb the curls too much unless the air low is too strong or you have fine hair involved.

If the hair is air-dried without a diffuser, the water in the hair, weighs down the hair while it is drying, therefore unless you remember from time to time during the drying process to squeeze the hair up, the hair will dry flatter but still defined.

Some of my recommended products that I like for curly hair are:
Prive – Curl Activator (medium hold)
Davines – Defining Cream (soft and light feel)
Tigi – Curls Rock, Curl Amplifier (crisper harder hold)
Ojon Hair – Animated Styling Cream (mild and soft)

Dekkos Daily Grind – Minnie

I would like to share some of the work we do on a daily basis in Dekko salon. Here’s a before and after client.

Minnie came in and was fed up of her long hair, she needed to look more professional as she was going to be practicing Law. She also needed to be able to loosen it up a bit after work, so she wanted to be given a versatile look that she could play around with.


Here’s Minnie before the haircut.

We decided to cut the hair to jaw level and because her hair is quite fine we graduated the back so it would lift the hair up and make it appear thicker. The ends were chopped into to give the hair more movement and then we gave her a more definite fringe to make the look stronger.

The look of a lawyer!

After applying some extra hair products we gave her a more casual messy look.
Thanks Minnie.


For Minnie’s look, the hair was cut using scissors, her hair was too fine to use other tools such as the razor or thinning scissors. All the edges were cut with texture with no blunt lines, this is to create softness rather than a hard look.


For the neat look Prive Weightless Amplifier was used.


And for the messy look we used Prive Texture Spray.